Battery chargers enhance the performance of batteries and can extend the life of the battery. Car batteries will discharge even when not in use as devices like alarms and clocks will continue to discharge the battery. Car batteries can also be used to store power to a certain extent.
The standard car battery is rated 12v and can be recharged with a maximum of 10 amps at 13.8 to 15 volts. The recommended float charging is one amp at (13.2 to 14v for some). You can check the recommended settings on the battery’s manual. This can also vary depending on the type of battery; whether AGM, Gel, or Lithium Batteries.
So can you charge a car battery with a solar panel? Yes, a standard 100-watt solar panel with a charge controller can provide around 5 amps to charge a battery and will take around 12 hours to fully recharge a battery with a battery voltage below 11.85. This can take two days depending on the amount of sunlight the panel is receiving. A smaller 5-watt panel can provide a trickle charge to maintain the battery and prevent it from dying.
How to Set Up Solar Panel to Charge a Car Battery
- Connect the Battery
Make the connection using the alligator clips or the O-ring terminals by connecting the red (positive) cable to the red terminal first. Then connect the black (negative) to the negative terminal. You should NEVER connect a Solar Panel to the Controller without a Battery.
2. Connect the Charge Controller
The charge controller should be clearly labeled for Positive and Negative (‘BATTERY + and -‘). This is where you hook up the batteries.
3. Connect the Solar Panel to the Charge Controller
Once you have connected the battery now connect the charge controller to the solar panels. The charge controller should also be labeled for a ‘PV INPUT + and -‘. This is where you hook up the cables from the panels.
- Check the Indicator
The controller will have an indicator to show that it is receiving a charge from the Panels. Once connected you confirm you can leave.
- Set Controller to Float/Trickle Charge
Charge controllers have three settings for Lead Acid batteries; Bulk, Absorption, and Float. Some controllers will have a button that you can continuously press in order to set it to Float. Other controllers will have an interface where you can set to float while some have applications with Bluetooth capabilities that you can set from your phone or laptop.
3-Stage Charging Using a Charge Controller
A battery charge cycle describes the voltage and current relationship and can be broken down into stages. A charge controller will allow you to set how you want your battery to be charged. You can pick from the 3-stages depending on the level of charge of your battery or your battery type.
The three stages are; bulk, absorption, and float and are applicable to Wet, Gel, and AGM Lead Acid batteries.
Bulk Charging
Bulk charging is the normal battery charging that provides a fast charge. To provide a fast charge sufficient sunlight must be available and the battery must have been deeply discharged.
Absorption Charging
The Absorption stage is where the battery slows down the amps going in the battery once a certain voltage is reached. It is conditioning mode to step down the charging but allow the panel to complete charging.
Float Charging
At the float stage the battery is full and is only being topped off with a small charge to compensate for the idle discharge.
Equalization
Some MPPT Chargers will routinely (once a month) apply an equalizing charge. This is the intentional overcharging of Lead Acid batteries to remove sulfate crystals that build up on the plates over time commonly referred to as sulfation.
Plug and Play Portable Solar Chargers
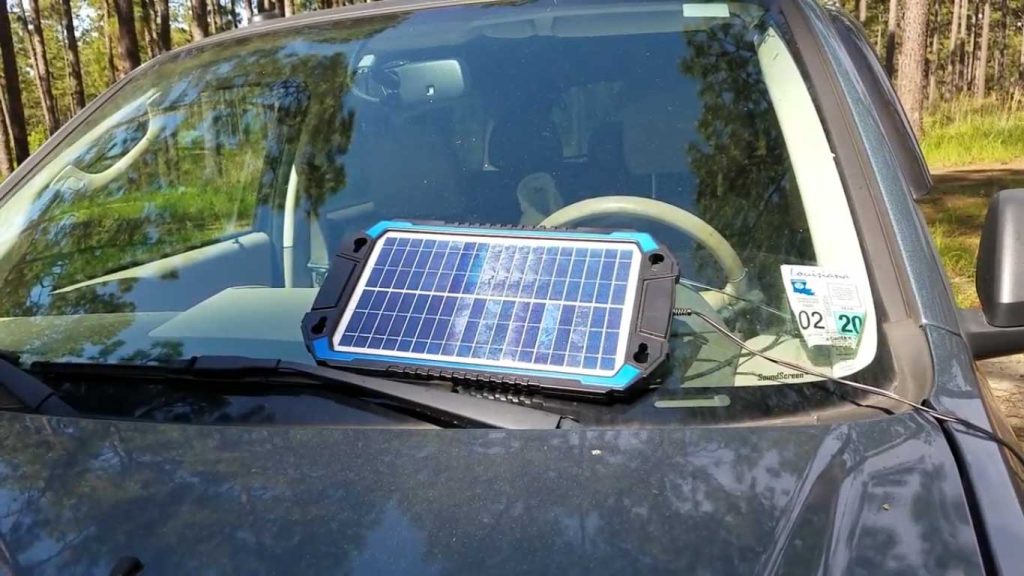
If setting up a solar panel is too much of a task for you and you can just buy a portable solar car battery charger that is easy to set up and use. Some come with Cigarette Lighter and OBDII connectors that you won’t have to open the hood of your car to charge. You simply place the solar charger on your windscreen or dashboard then connect it to the cigarette lighter and you can leave it for hours without worrying about overcharging.

Ensure that before selecting a charger for your car battery whether a solar charger or a regular charger check the manual for instructions. Charging voltages will vary according to the capacity, battery type, condition, and state of charge of the battery.
Also ensure to follow all safety precautions as batteries contain sulfuric acid which can cause severe burns and can also produce dangerous gases. Check safety instructions from the charger as well.
How Trickle Charging Works
A battery charge cycle describes the voltage and current relationship of a battery. A battery goes through various stages before it comes fully charged. There are three main stages of charging a lead-acid battery; bulk, absorption, and float charging.
A trickle charger is meant to maintain the battery at this state as the battery slowly discharges. This is especially for batteries where even while even in storage it continues to discharge slowly and leaving it the battery will completely discharge and you may have to jump-start the battery. This reduces the battery’s life and even ruins it completely.
How many amps for a Trickle Charger
Trickle Chargers for 12v batteries are designed to supply less than 1 Amp of charge. At less than 1 amp the charger will not overcharge the battery but some other features are added on to trickle chargers to ensure this.
Some trickle chargers can go up to 2 amps and go down to 1 amp or less as the battery charges. The amps to trickle charge a battery will depend on its size and its discharge rate.
Trickle Charger for Car Battery
A trickle charger is very important for car batteries to maintain the charge on a car battery when the car is not being driven. It keeps the battery from being drained by the car’s electrical system and keeps it charged so it is ready to start the car when needed.
When you leave your car for long periods of time you may find a dead battery. The battery discharge of a car battery is even higher than for idle batteries as the car’s electrical system which includes Alarms and lights continues to issue the battery’s charge.
So for a car battery not only does it need a maintainer but to be regularly topped off against this discharge.
To use a trickle charger with a car battery, you will need to connect the charger to the battery using the proper connectors. Once the charger is connected, you will need to turn on the charger and let it run until the battery is fully charged.
Consider a Solar Trickle Charger
A solar trickle charger is a small solar panel designed to provide a small charge to keep your battery topped off. A solar trickle charger is really easy to use and anyone can use it. It is also convenient as it only requires power from the sun. This means that you can use it from anywhere.

Solar chargers have been specialized with 12v connectors that include alligator clips, cigarette lighter connectors, and o-ring terminals that can be easily connected to the battery and charge your batteries.
A Solar trickle charger can be used on cloudy and even during winter as they do not require much sunlight in order to operate. A 5-watt solar panel can be used to trickle charge your car, boat, and even RV battery i.e batteries over 50 ah without the need of a charge controller.